
So, let's get to it, shall we?
Thank you, Mimi Kirchner! If you want to find out about Mimi, just click on any picture in this blog post. It will take you right to her blog!
I want to grow tomatoes this year. I want to have a LOT of tomatoes instead of a few very precious and expensive ones from the farmers market. Unfortunately I live in an old house with toxic soil around it- not unusual in New England urban and suburban areas. The soil has years of lead paint scrapings, car fumes (more lead) and who knows what. It is not soil anyone would want to grow edibles in. The solution is raised beds or containers. I am going to try to write a tutorial about how I planted my tomatoes based on the excellent suggestions of Bella Dia.
I think I’ve mentioned before that I have a house full of stuff. That makes me reluctant to go out and buy more stuff- like containers to grow tomatoes in. Here is how I made my own, hopefully biodegradable, containers and got my tomatoes started.

material list-
an old cotton T-shirt, size X-Large
some garden fencing that was stuck up in the rafters of the garage, already starting on the biodegrading part- ie rusty.
compost from my compost pile
commercial potting soil
tomato plant
Step 1: Cut the label out of the shirt since it is probably not cotton and wouldn’t decompose.

Step 2: Make a circle shape out of the wire fencing. Mine is about 16 inches across.
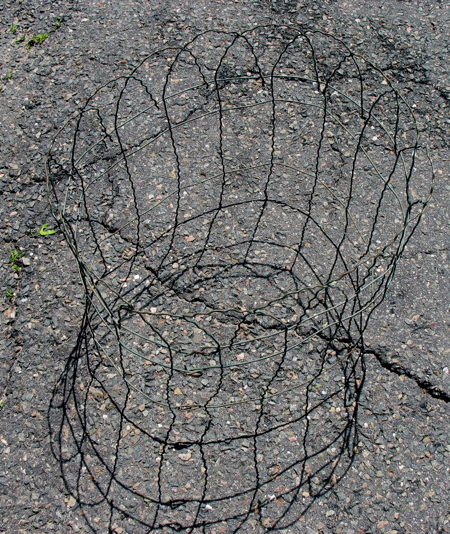
Step 3: Place in the garden and push the wire prongs into the soil.
Step 4: Put the t-shirt into the circle, collar edge down. Stretch the bottom edge of the shirt around the top of the fencing. I didn’t worry about weeds underneath- whatever was there will be dead soon.
Now there is a “pot”!
Step 5: Fill it half way with compost or other clean filler dirt, like all last years window boxes that you are replanting. I used compost from my compost pile. Push and stretch out the sides of the t-shirt as you add dirt.

Step 6: Center the tomato plant on top of the compost. Loosen up the root ball.
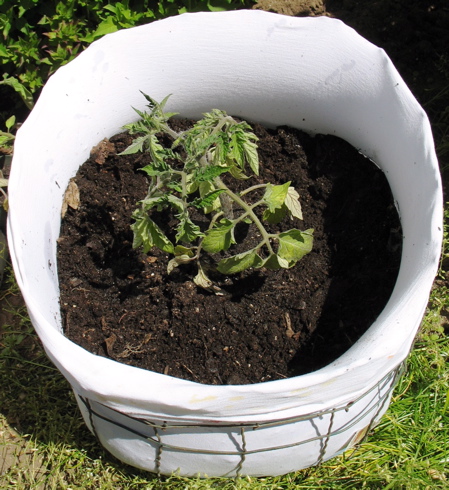
Step 7: Use the commercial potting soil to fill in around the plant and up to an inch or so from the top. Yes, you are burying 6 inches of stem and leaves. Trust me, that is a good thing. Water thoroughly.

Step 8: Wait 2 months. Hopefully, tomatoes!

I’ve got 4 done. One more to go.
This entry was posted on Monday, May 26th, 2008 at 6:03 pm
No comments:
Post a Comment